Dragon Quest 3 Ремейк: навигация на логово Барамоса
Быстрые ссылки
Вступив в путешествие, чтобы победить логовой зал Барамоса в Dragon Quest 3 Remake отмечает ключевой момент в вашем приключении. После обеспечения шести шаров и вылупления Рамии Everbird, вы готовы заняться этим сложным подземельем, которое служит свидетельством вашего прогресса и ворота в более темные сферы под главной картой. В этом комплексном руководстве мы проведем вас через тонкости поиска и освоения логова Барамоса в римейке Dragon Quest III HD-2D.
Лэг Барамоса является оплотом Archfiend Baramos, центрального антагониста первой половины римейка Dragon Quest 3. Доступ к этому подземелью требует разблокировки Ramia the Everbird, которая доставит вас в долину, окружающую логово. Желательно обеспечить, чтобы ваш герой достиг, по крайней мере, 20, прежде чем перейти к этой грозном вызове. Лэг нагружен важными предметами, которые мы подробно описываем в каждом разделе этого руководства.
Как добраться до логова Барамоса в римейке Dragon Quest 3
 Завершив мау некрогона и приобретая серебряный шар, вы разблокируете Everbird. Чтобы добраться до логово Барамоса, у вас есть возможность летать прямо из святыни Эверберда или Храма Некрогона.
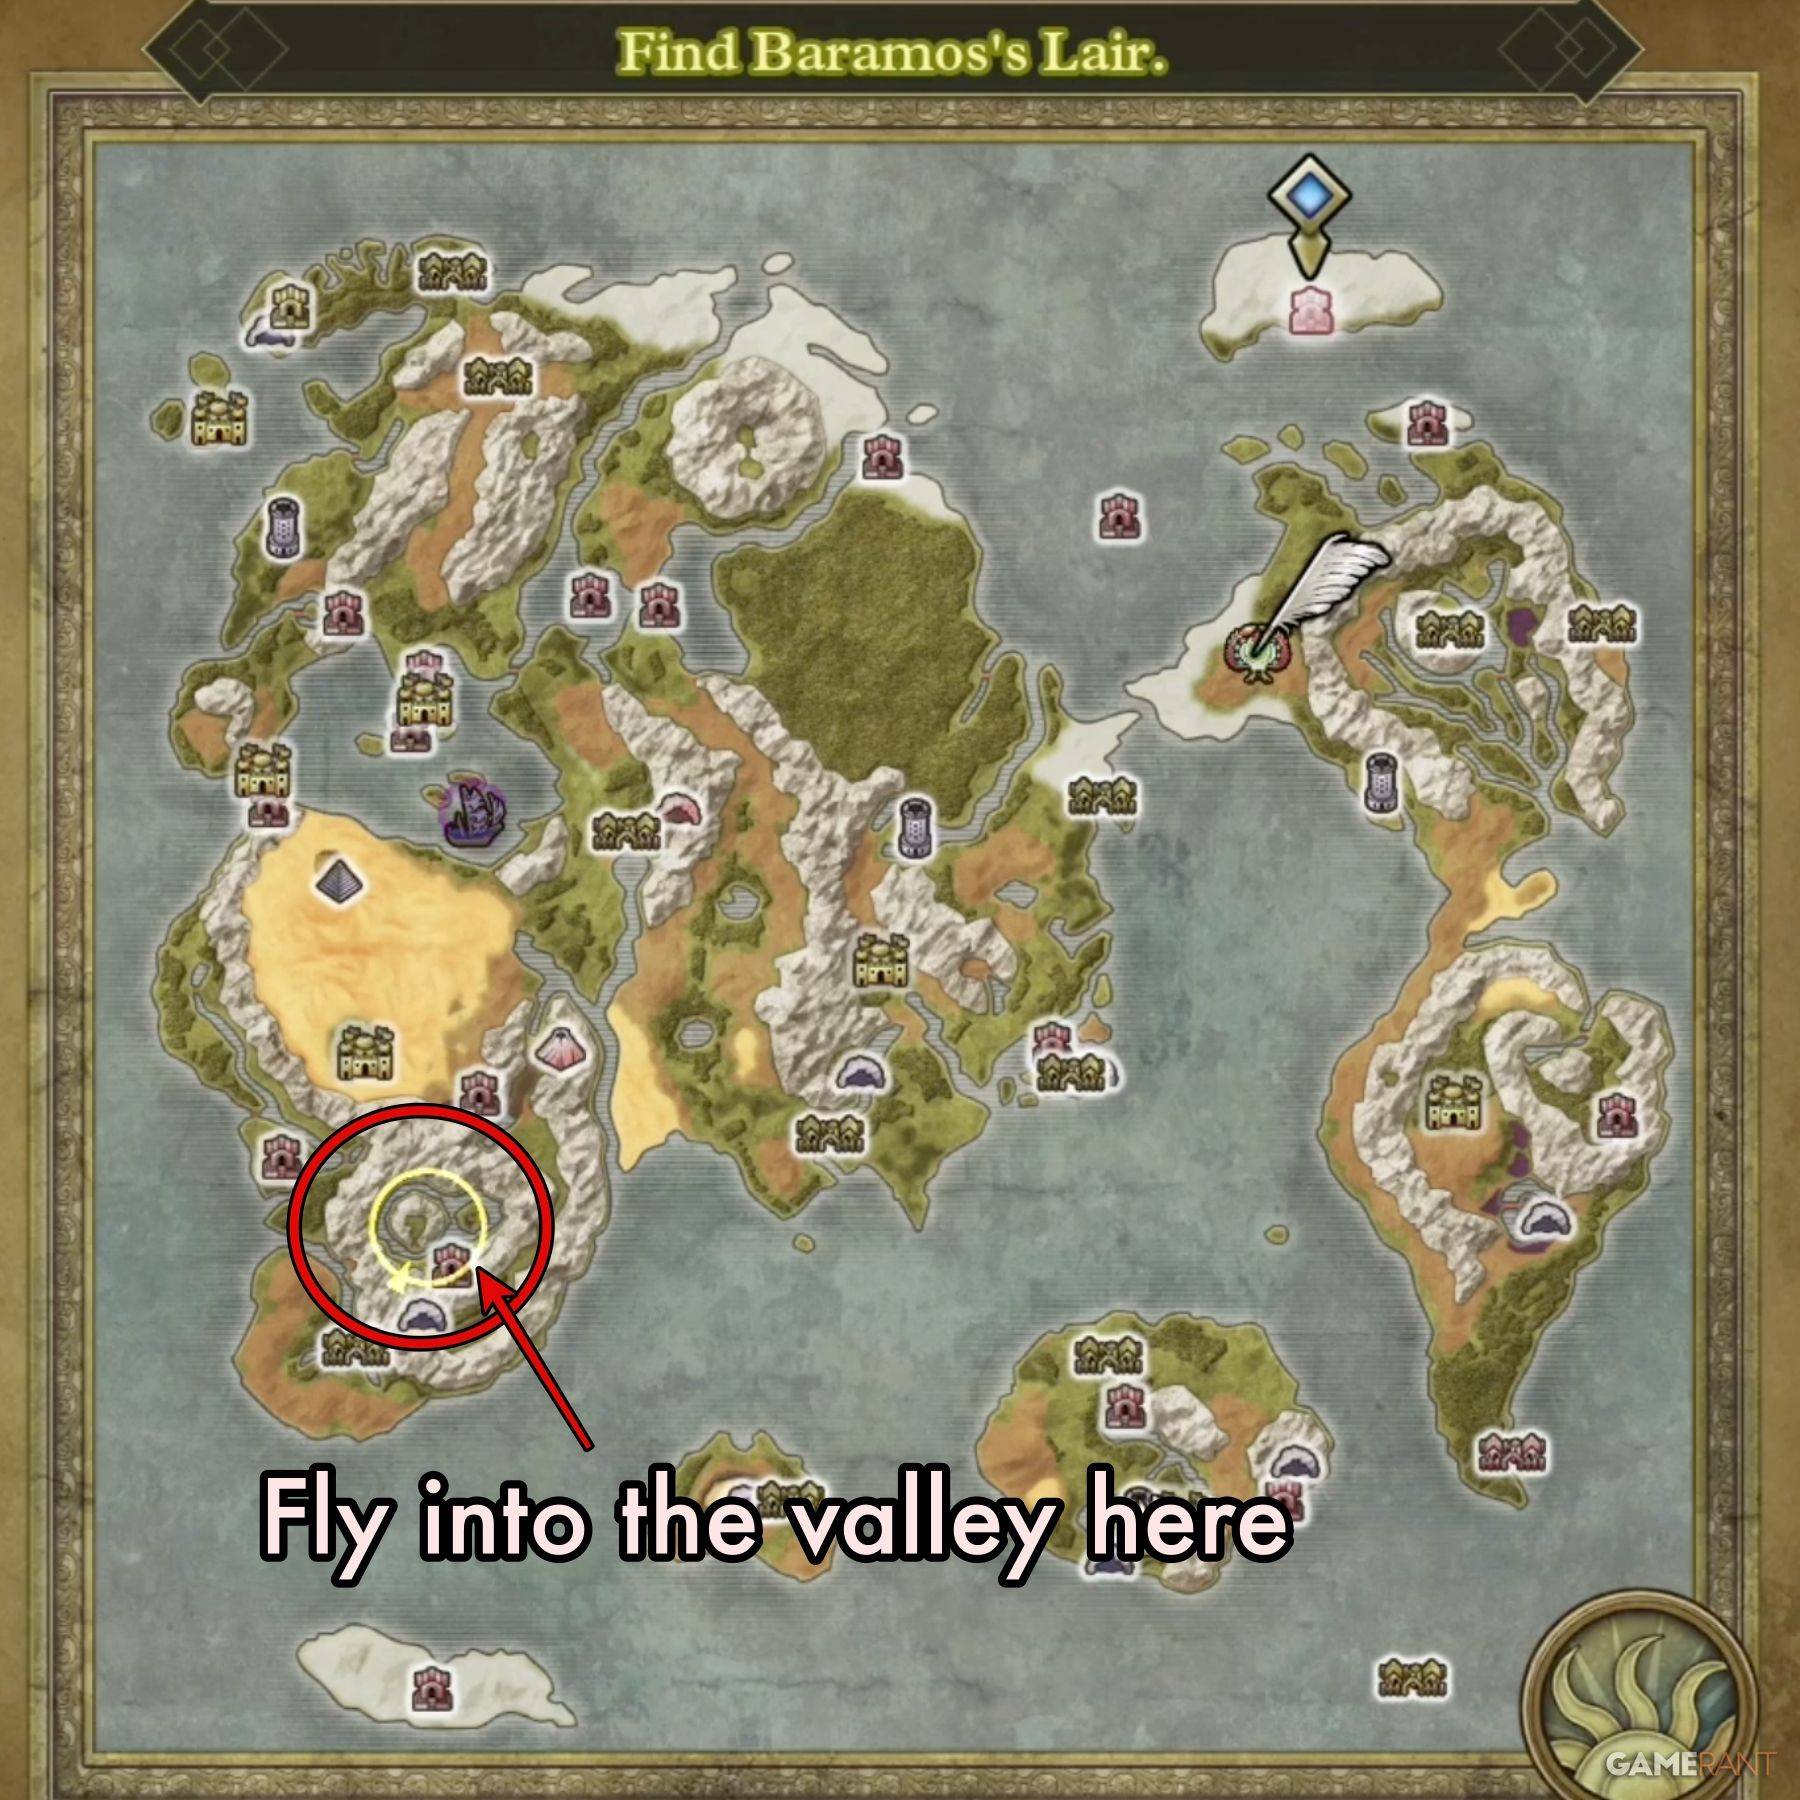
К северу к северу от святыни Некрогонд находится остров, окруженный горами, где проживает логово Барамоса. Используйте Рамию, чтобы лететь прямо в это место и приземлиться возле входа в подземель. Пройдите на север, чтобы войти в подземелье, как в городе.
Прохождение за логово Барамоса - Ремейк Dragon Quest 3
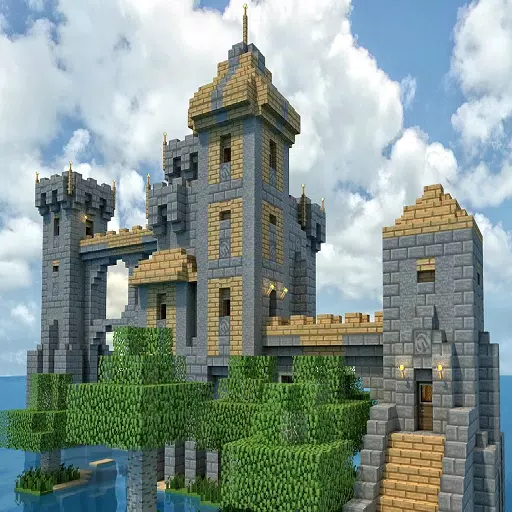
Войдя в логово Барамоса в римейке DQ3, вы обнаружите, что он отличается от типичных подземелий. Вместо прямого вертикального прогрессирования вы перемещаетесь по смесь внутренней и наружной площади, стремясь противостоять Archfiend Baramos.
Первоначальная область, с которой вы столкнетесь, - это окружение Барамоса, которое служит основным открытым центром. Вы вернетесь сюда после выхода из любой структуры или прохода. Мы рассмотрим основной путь к боевой палате босса, за которым следует подробное руководство по сокровищам на каждом этаже.
Как достичь боя Барамоса - Главный путь:
- Шаг 1: С отправной точки обойдите главную дверь, ведущую в область «входа». Вместо этого перейдите по восточной стороне замка к бассейну воды в северо -восточном углу карты.
- Шаг 2: Пойдя по лестнице, ведущей к бассейну, поверните налево и направляйтесь на запад к другому набору лестницы. Войдите на эти лестницы и войдите в дверь справа от вас.
- Шаг 3: Вы окажетесь в восточной башне. Поднимайтесь на вершину и выйдите.
- Шаг 4: Теперь на крыше замка, видимой на карте окружающей среды, направляйтесь на юго -запад через крышу, затем спуститесь по лестнице на нижний уровень. Продолжить запад, перейдите по зазорам в двойной стене на северо -западной крыше и используйте лестницу в северо -западном углу.
- Шаг 5: Спуститесь в центральную башню. Отправляйтесь в юго -западный угол, используя заклинание безопасного прохода, чтобы пересечь электрифицированные панели пола, и перейдите по лестнице до прохода B1 A.
- Шаг 6: В проходе B1 вы можете пойти на юг или повернуть на восток. Выберите на восток и перейдите к лестнице на дальней восточной стороне.
- Шаг 7: Войдите в юго-восточную башню. От юго -восточной части карты отправляйтесь на северо -восток к лестнице и поднимайтесь на крышу. Короче говоря, идите на запад, прежде чем спуститься с другой набор лестниц к западной части карты. Пересеките траву на северо -запад и войдите в единственную доступную дверь.
- Шаг 8: Эта дверь ведет к северо -восточному углу центральной башни. Выйдите через единственную доступную дверь.
- Шаг 9: Теперь вы будете в B1 Parringway B, длинный коридор с одним входом и выходом. Продолжайте на север и поднимайтесь по лестнице.
- Шаг 10: Войдите в тронный зал и выйдите через южный край, избегая панелей пола.
- Шаг 11: Вернитесь на карту окружающей среды, найдите тронный зал в северо -западном углу. Направляйтесь на восток к сооружению на острове на озере, который является логовом Барамоса, местом боя босса.
Все сокровища в логове Барамоса - Ремейк Dragon Quest 3
Все окрестности сокровища:
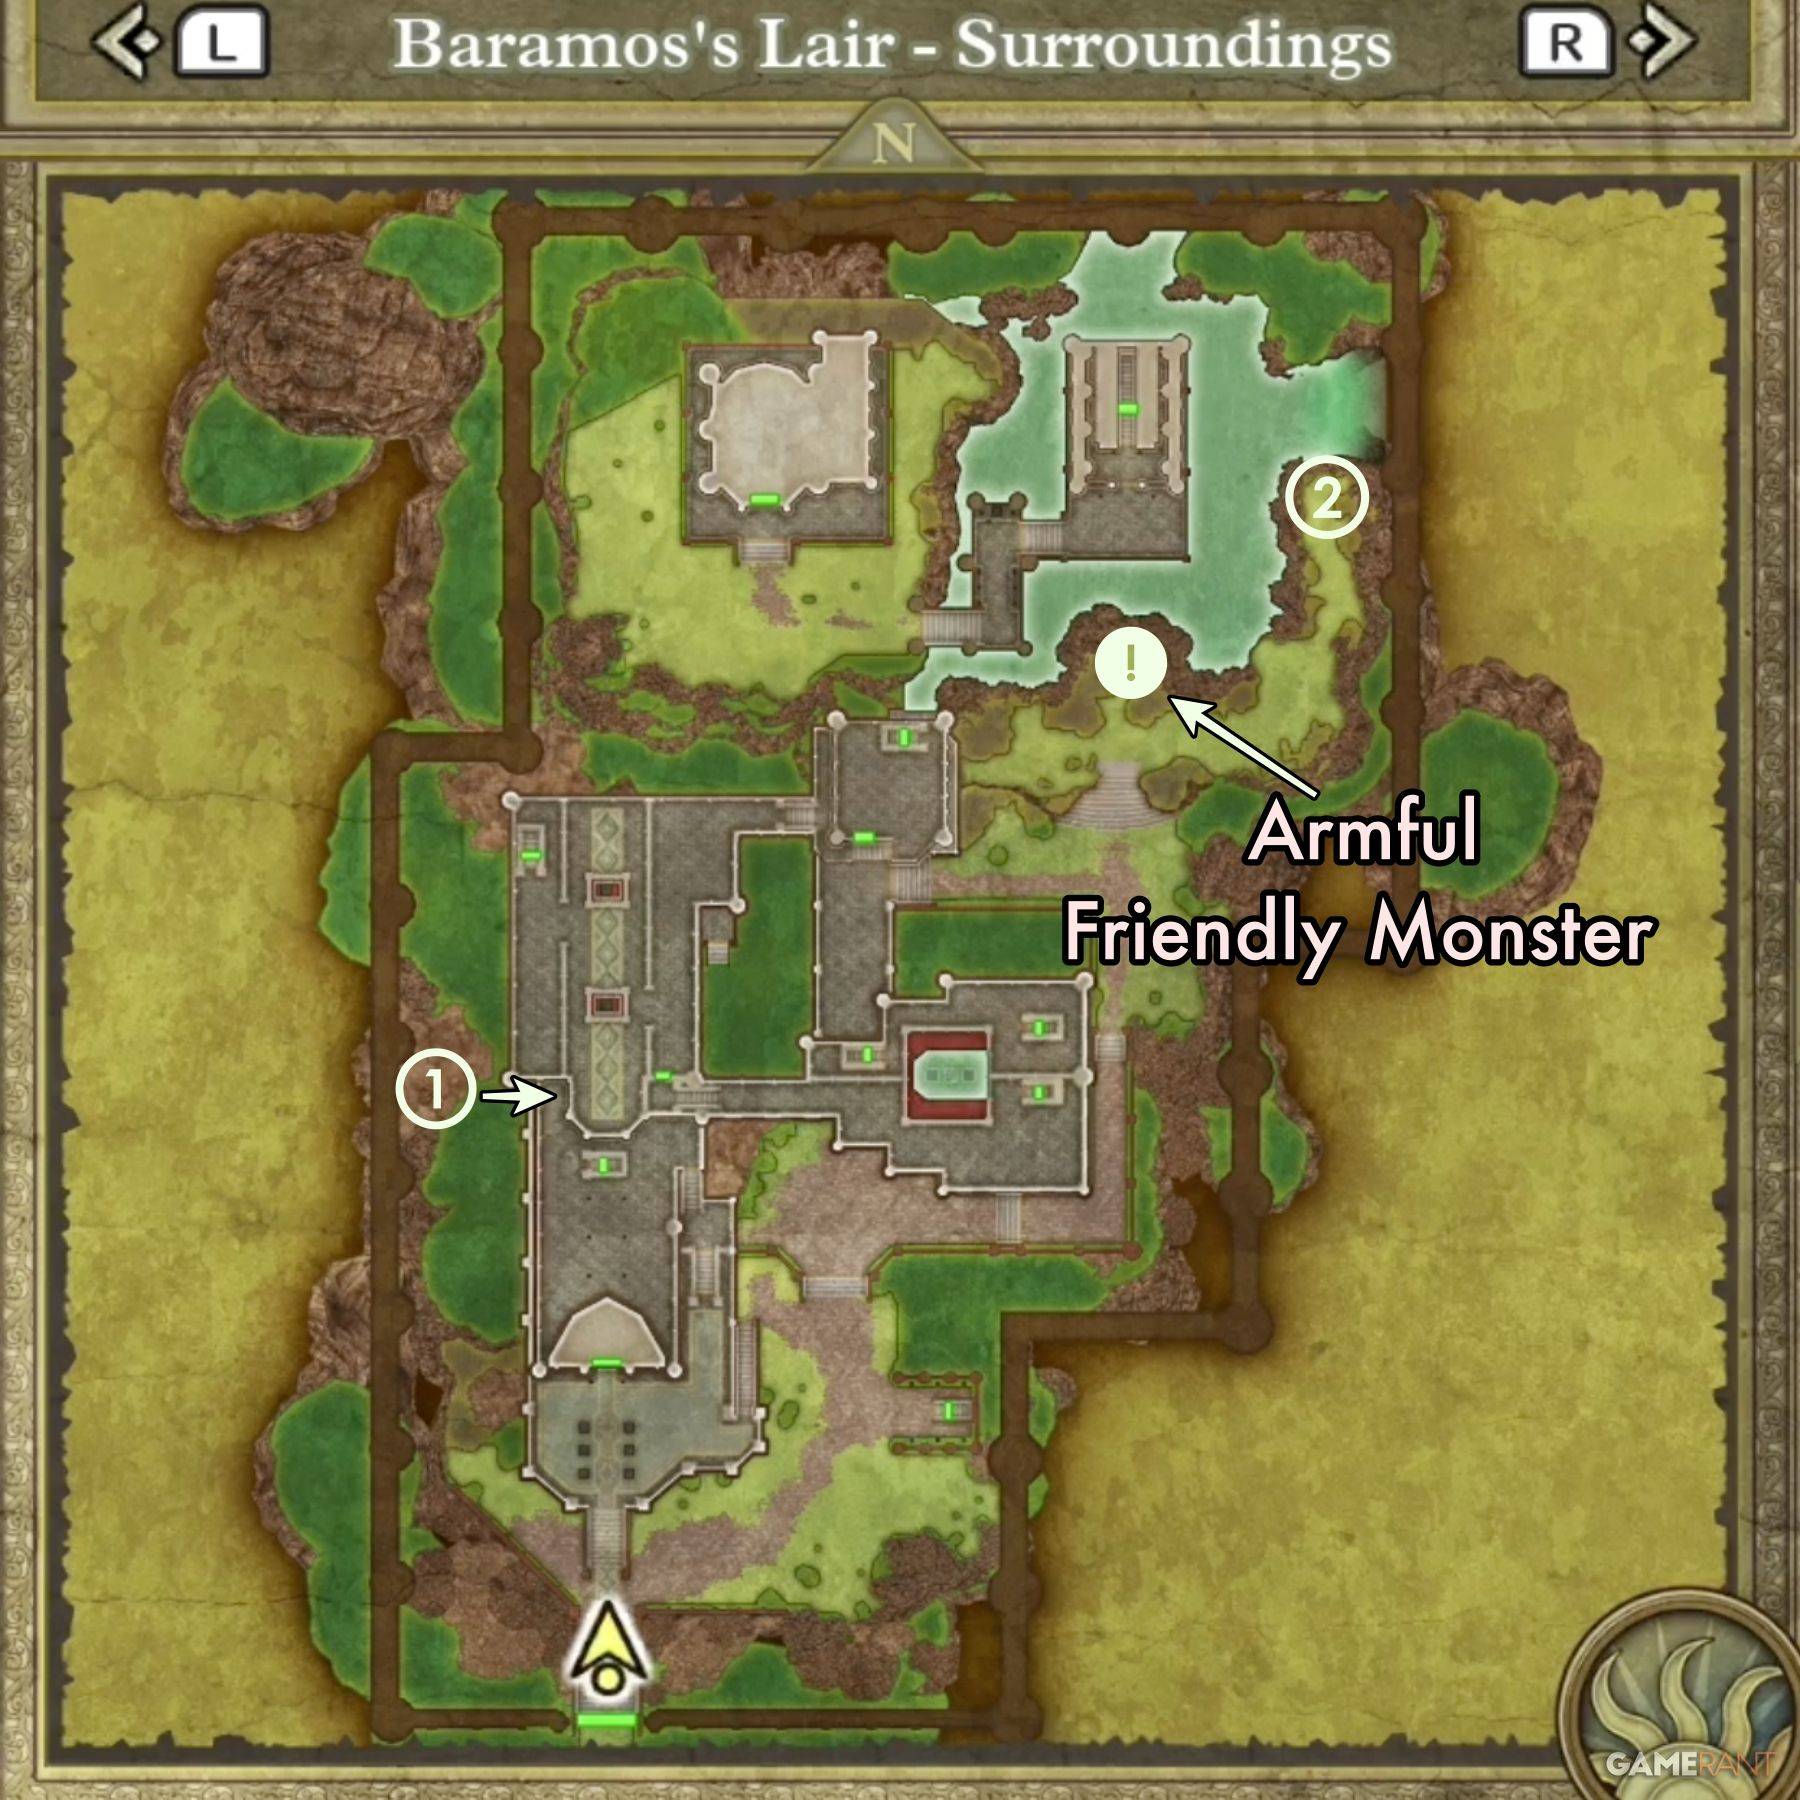 - Сокровище 1 (грудь): молитвенное кольцо
- Сокровище 2 (похоронен): плавное платье
На карте окружающей среды есть один из дружелюбных монстров Dragon Quest III Remake, вооруженного по имени Армстронг.
Все сокровища Центральной башни:
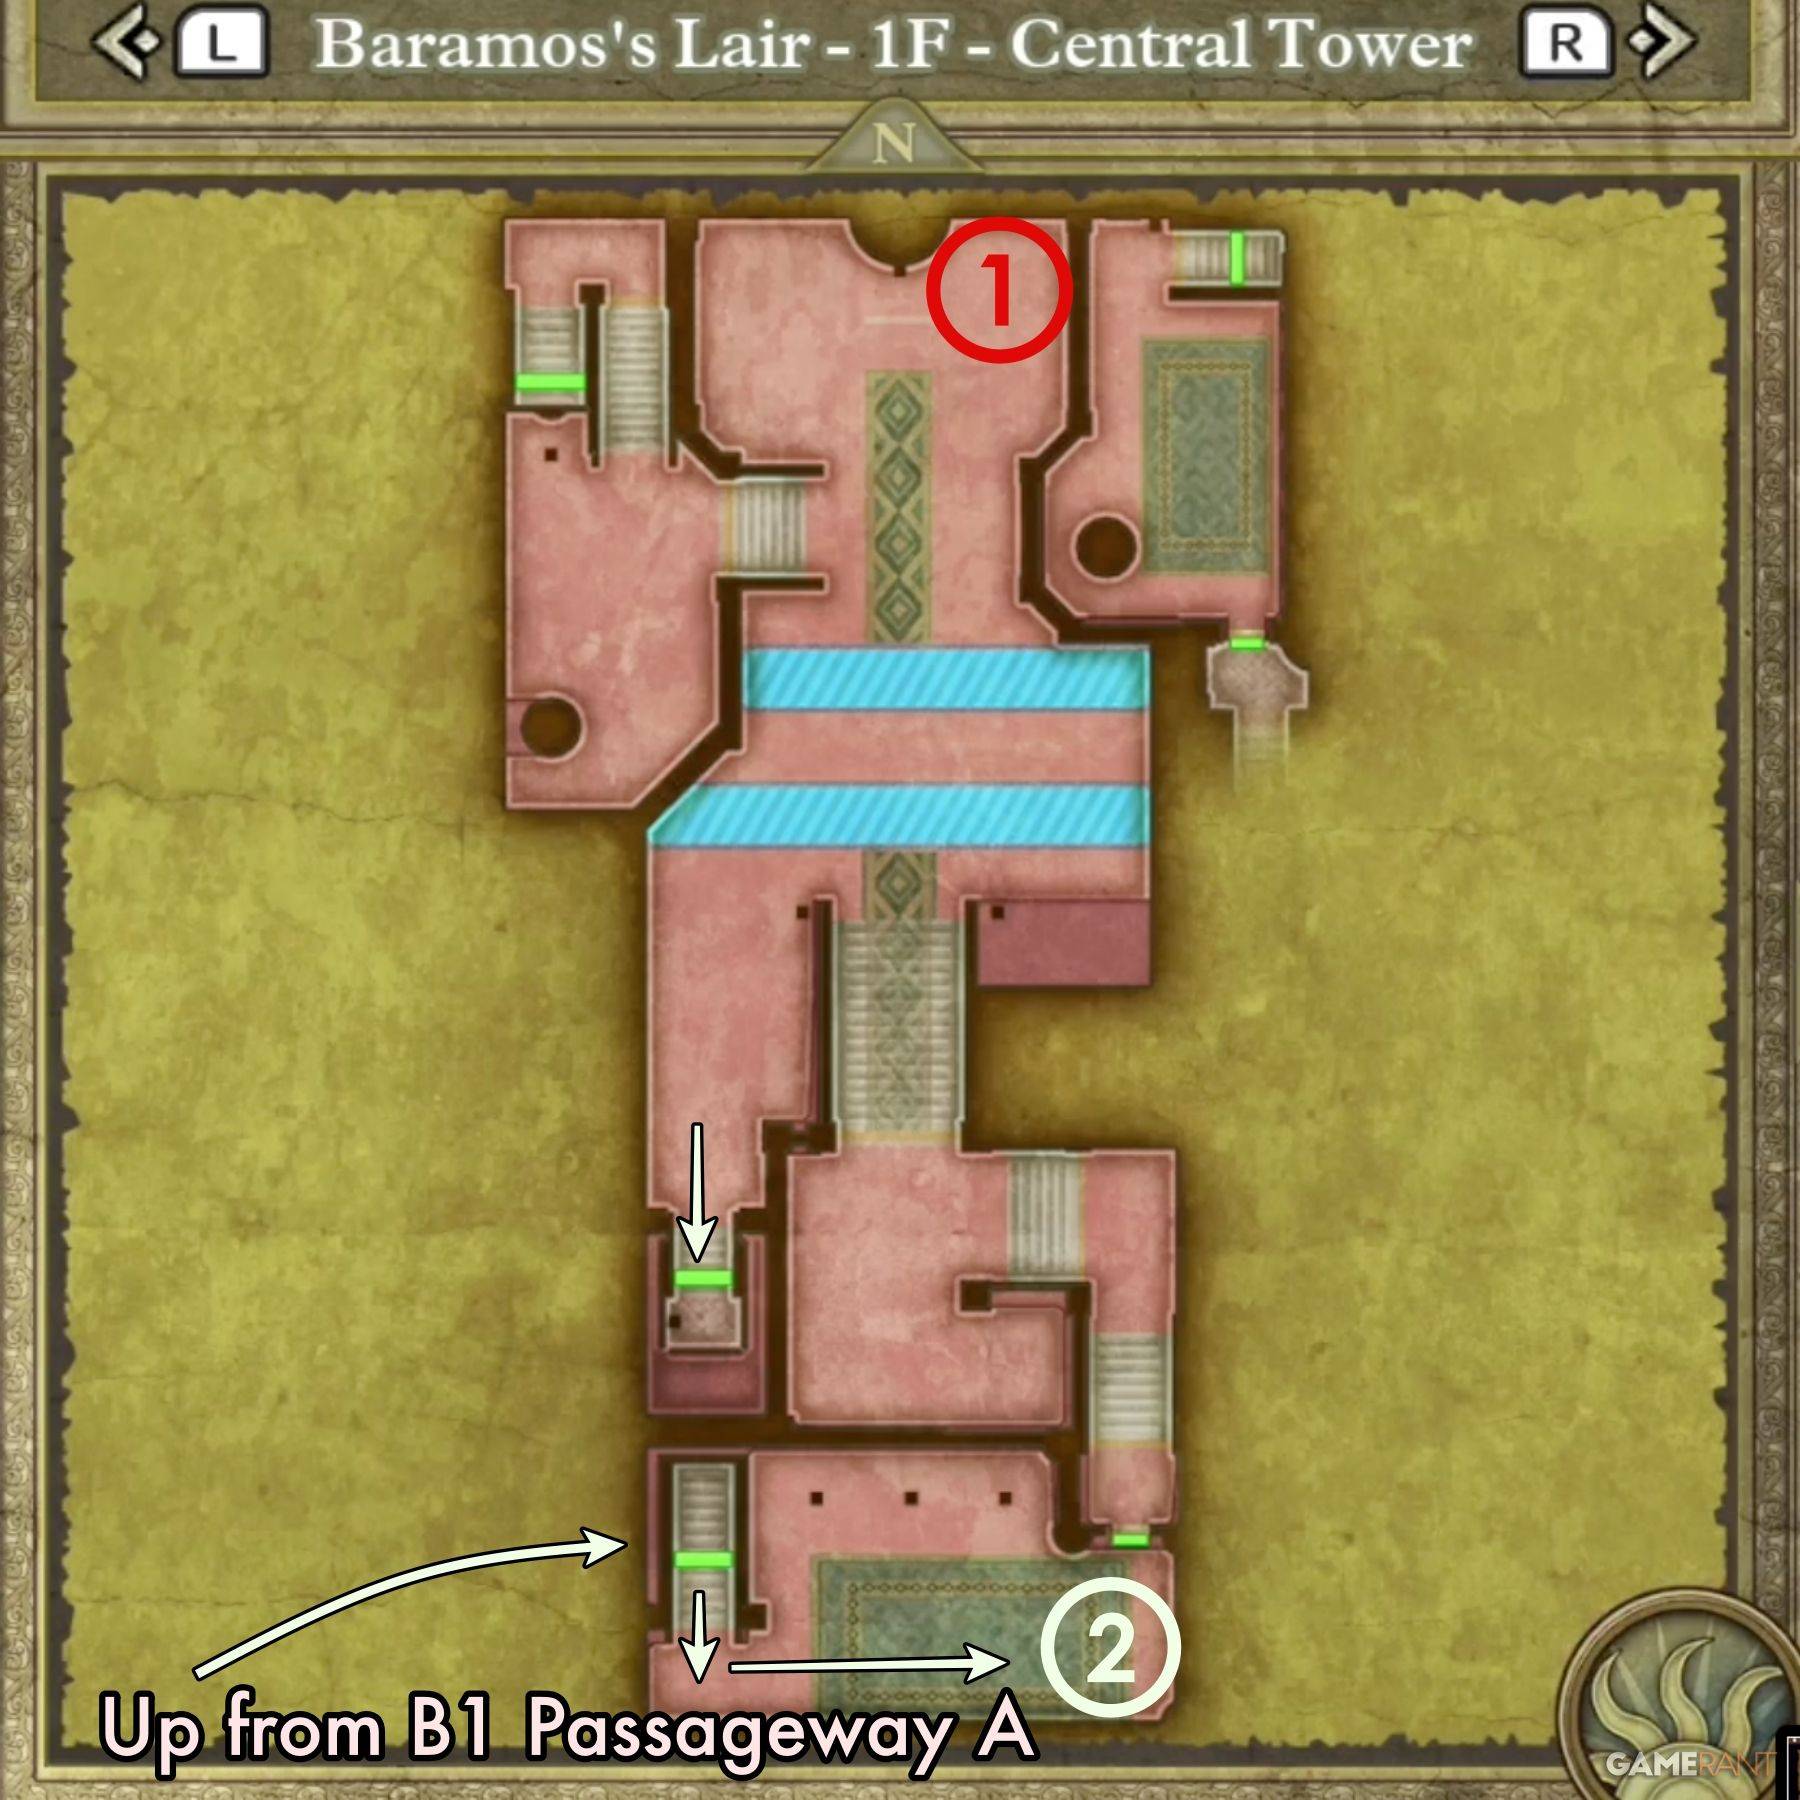 - Сокровище 1: имит (враг)
- Сокровище 2: Dragon Mail
Все сокровища юго-восточной башни:
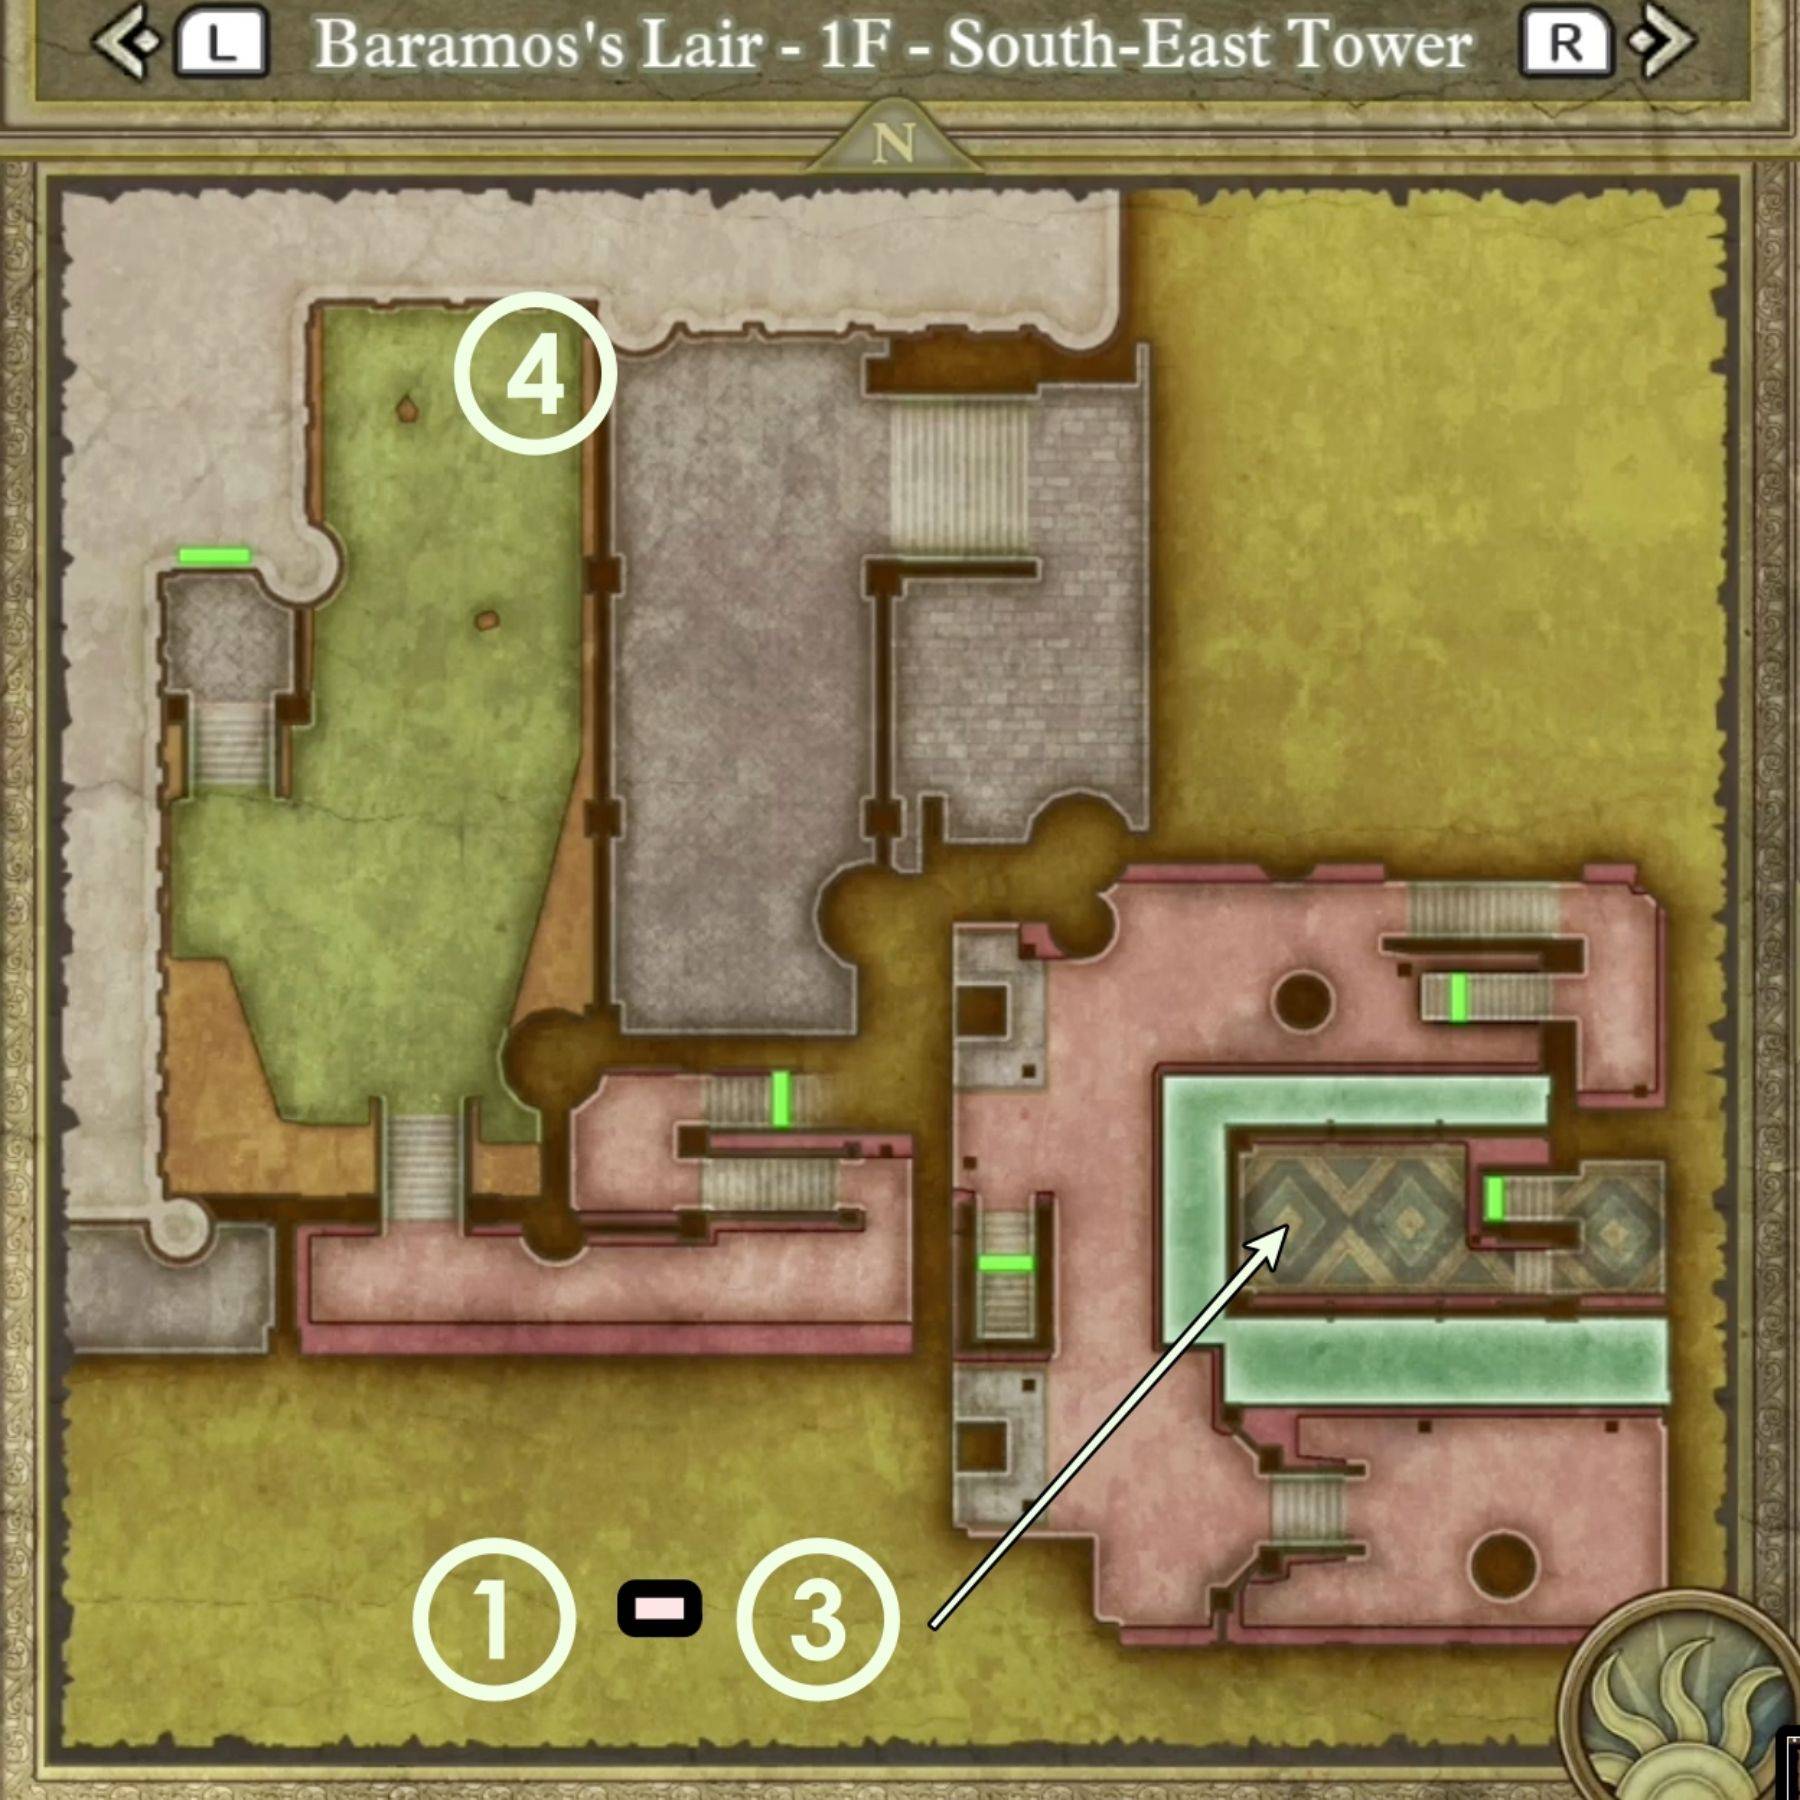 - Сокровище 1 (сундук): несчастный шлем
- Сокровище 2 (сундук): эликсир мудреца
- Сокровище 3 (сундук): топор Хедсман
- Сокровище 4 (грудь): зомбисбен
Чтобы получить доступ к трем сундукам с сокровищами в юго-восточной части карты юго-восточной башни, достигните центральной башни, как указано на главном пути. Выйдите через юго -восточную дверь, направляйтесь на восток через крышу, спуститесь по лестнице, и вы найдете платформу с сундуками.
Все сокровище B1 Parshway:
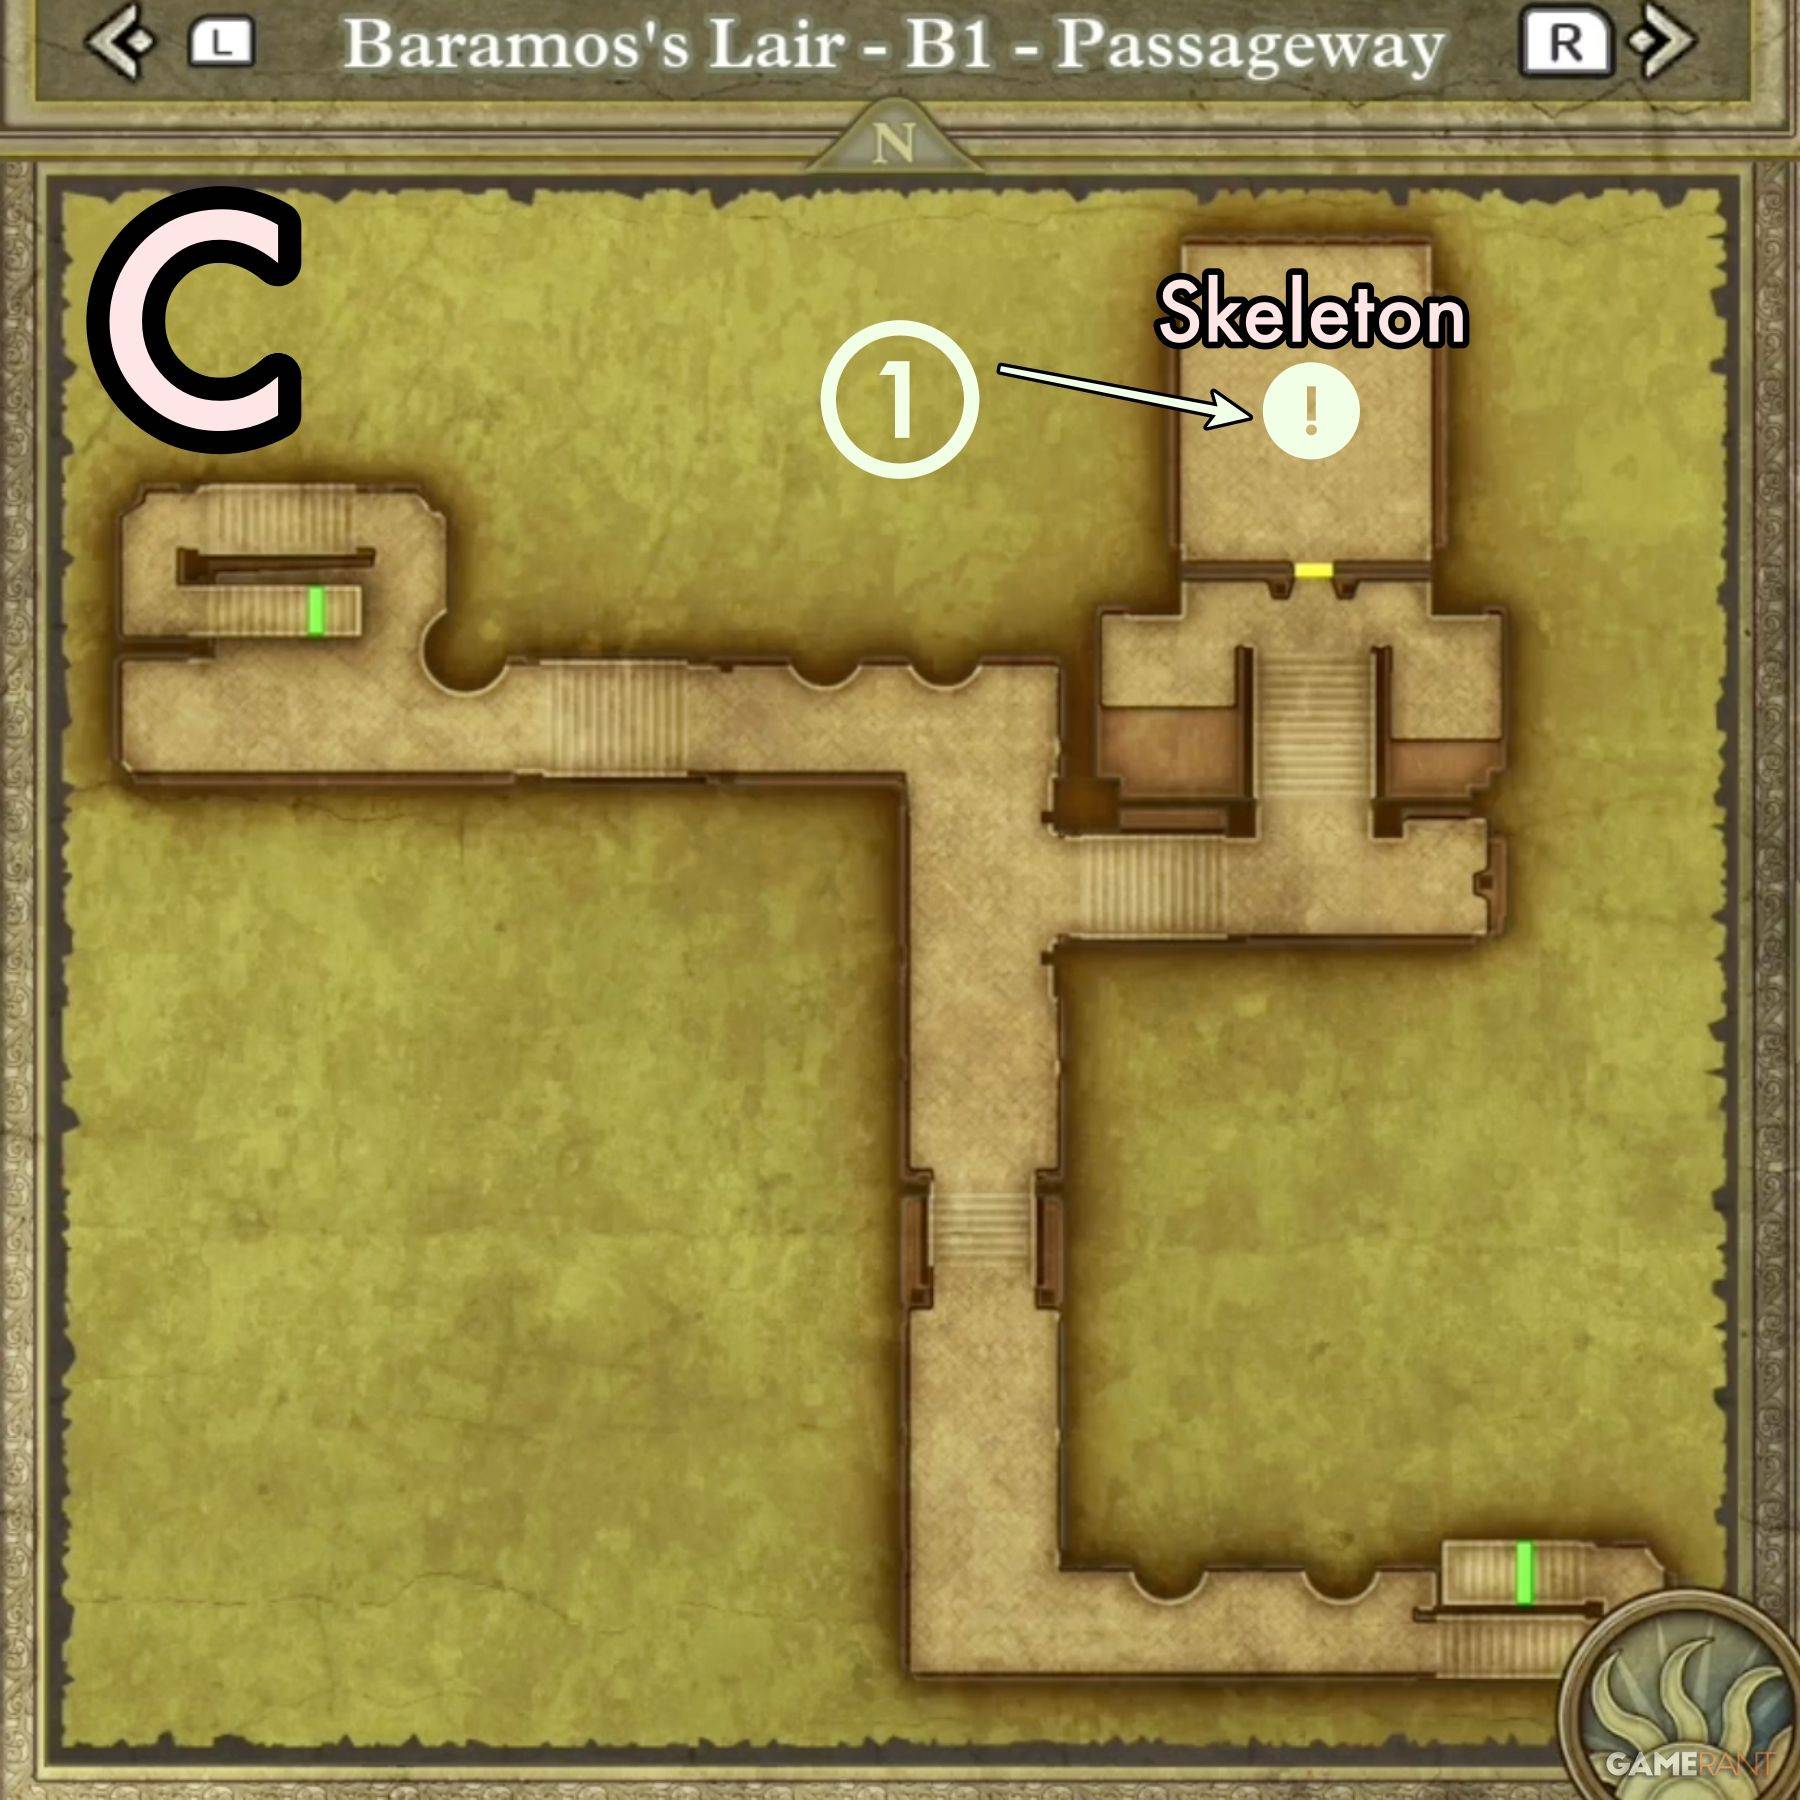 - Сокровище 1 (похоронен): мини -медаль (на левой стороне скелета)
Чтобы добраться до этой области, перейдите к северной части входной карты. Возьмите западную лестницу, чтобы спуститься в B1 Parstray C.
Все сокровище тронного зала:
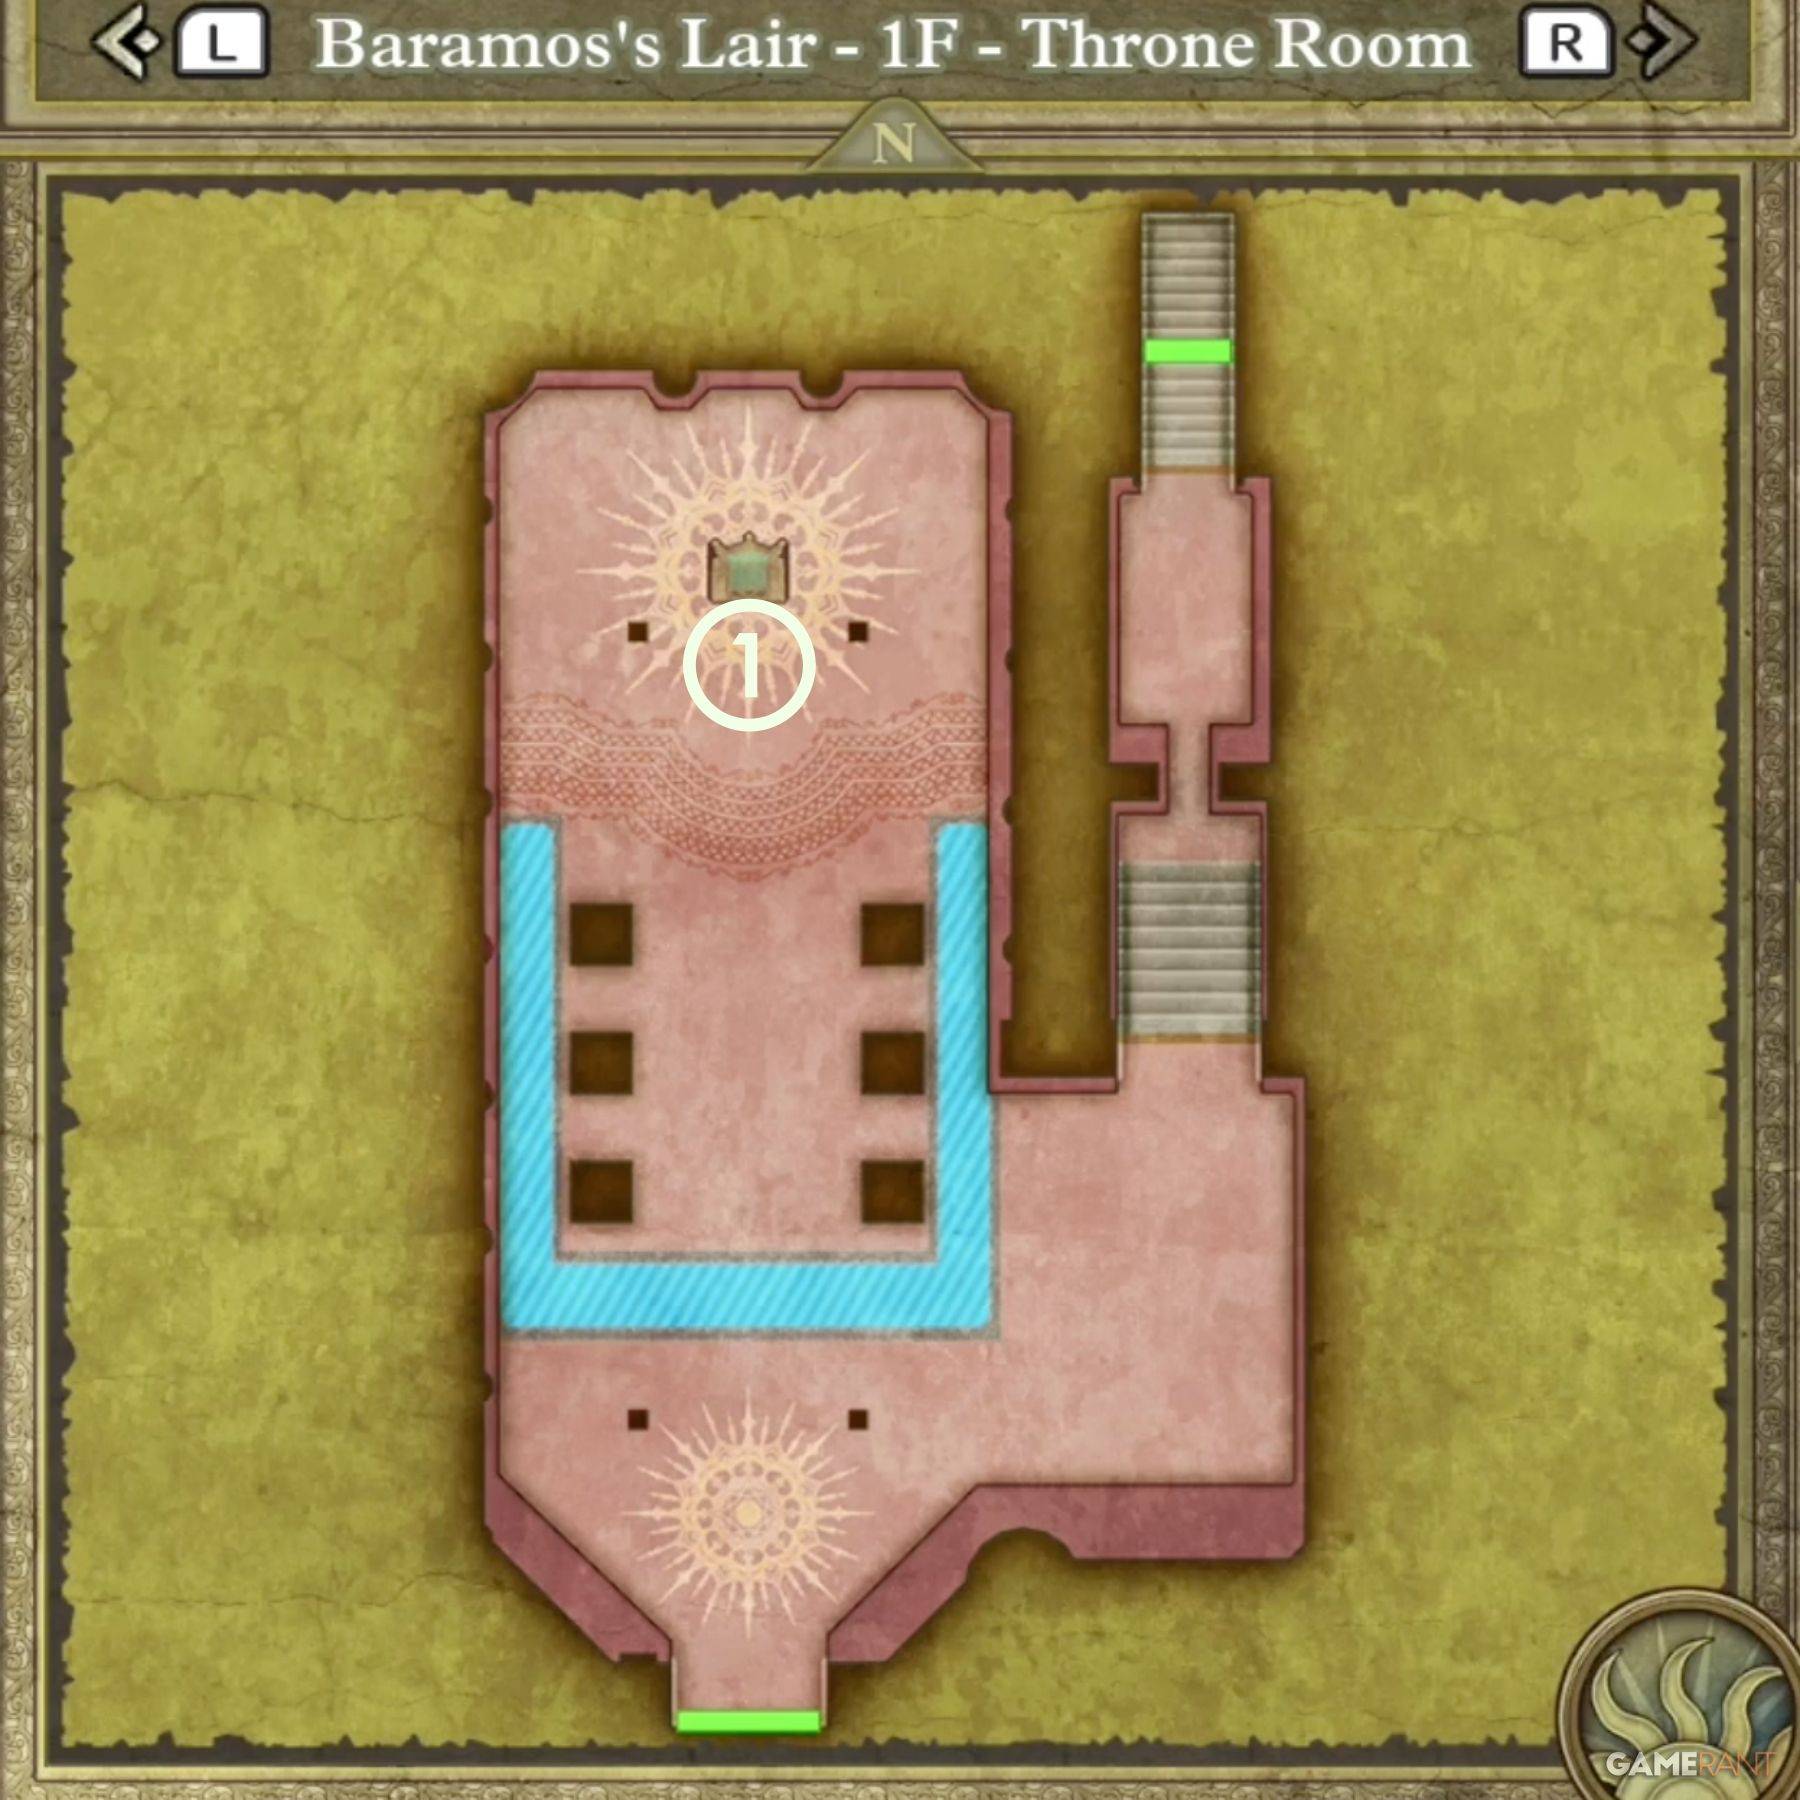 - Сокровище 1 (похоронен): мини -медаль (перед троном)
Как победить Baramos - Dragon Quest 3 remake
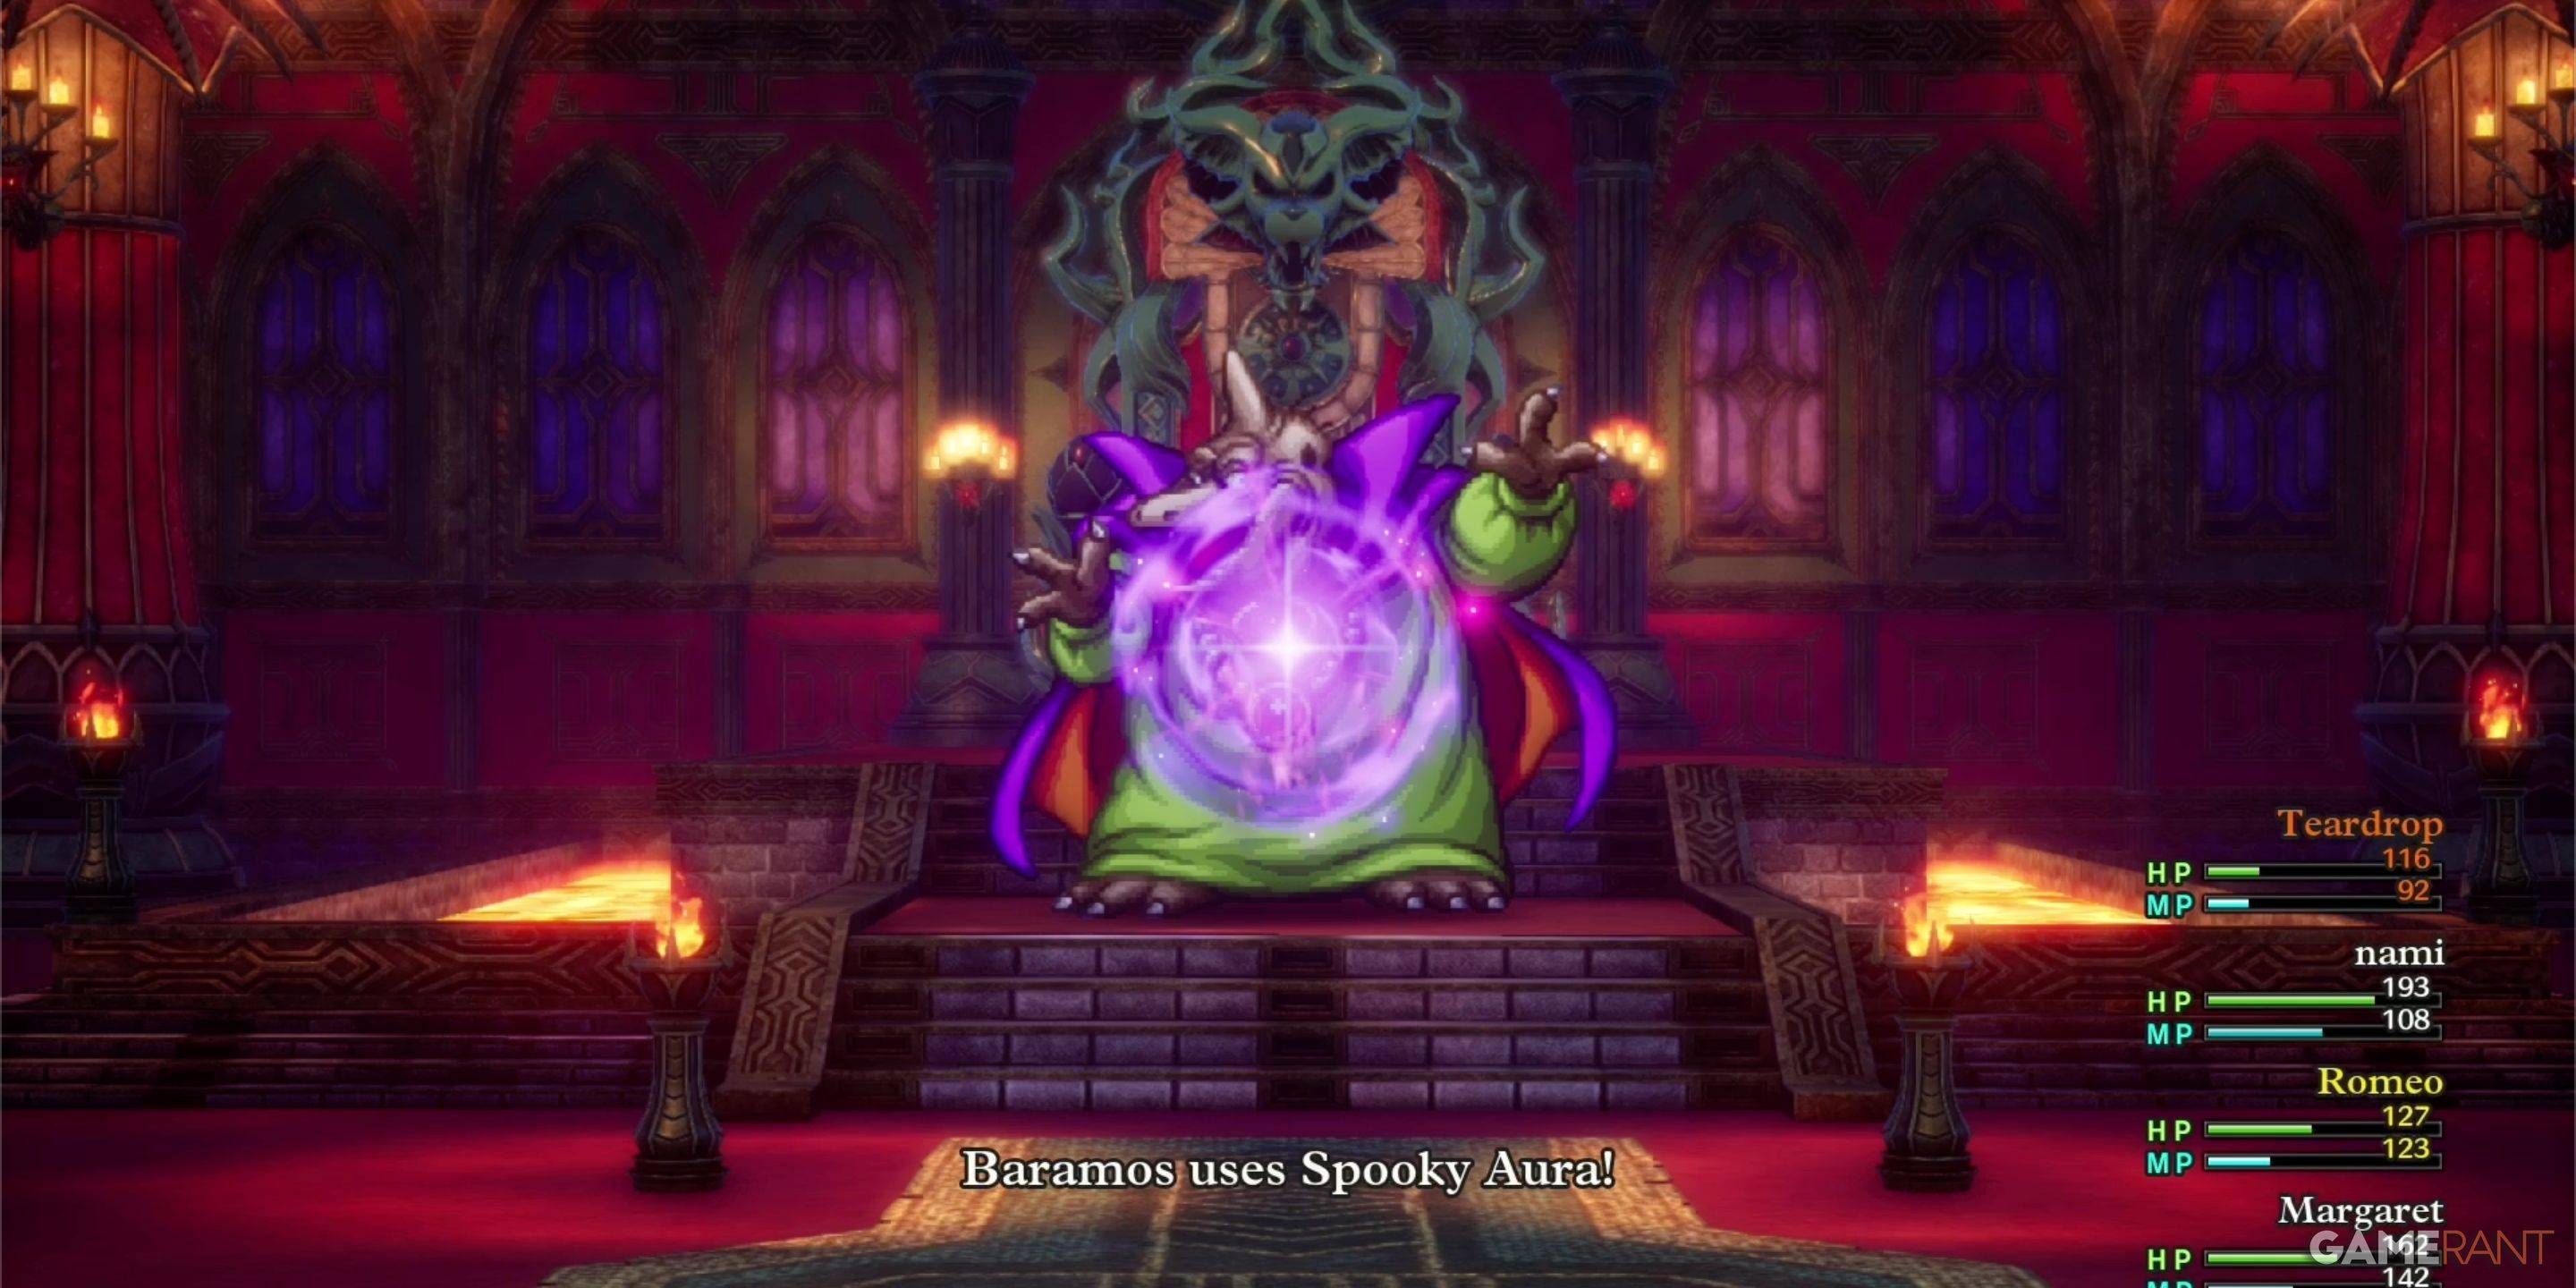 Ваша первая встреча с Baramos в римейке DQIII, вероятно, станет самой сложной битой, с которой вы столкнулись. Чтобы стать победителем, вам понадобится солидная стратегия и адекватное выравнивание.
Что такое римейк Dragon Quest 3?
Понимание слабостей Барамоса имеет решающее значение для разработки эффективной стратегии. Барамос уязвим:
- Крэк (все заклинания на основе льда)
- Woosh (все заклинания на основе ветра)
Примечательно, что Барамос не слаб по заклинаниям. На этом этапе вы должны иметь доступ к заклинаниям более высокого уровня, таким как Kacrack и Swoosh. Поскольку герой не может разыграть их, рассмотрите возможность использования их для исцеления, в то время как два заклинания сосредоточены на нападении или используют порывку.
Поддерживайте хотя бы одного преданного целителя на протяжении всей битвы. Даже в том, что они хорошо выравниваются, Барамос может быстро уничтожить вашу вечеринку. Приоритет исцелению каждый раунд, так как нет никакого преимущества в том, чтобы быстро победить Барамоса. Сосредоточьтесь на выживании над скоростью.
Каждый монстр в логове Барамоса - Dragon Quest 3 remake
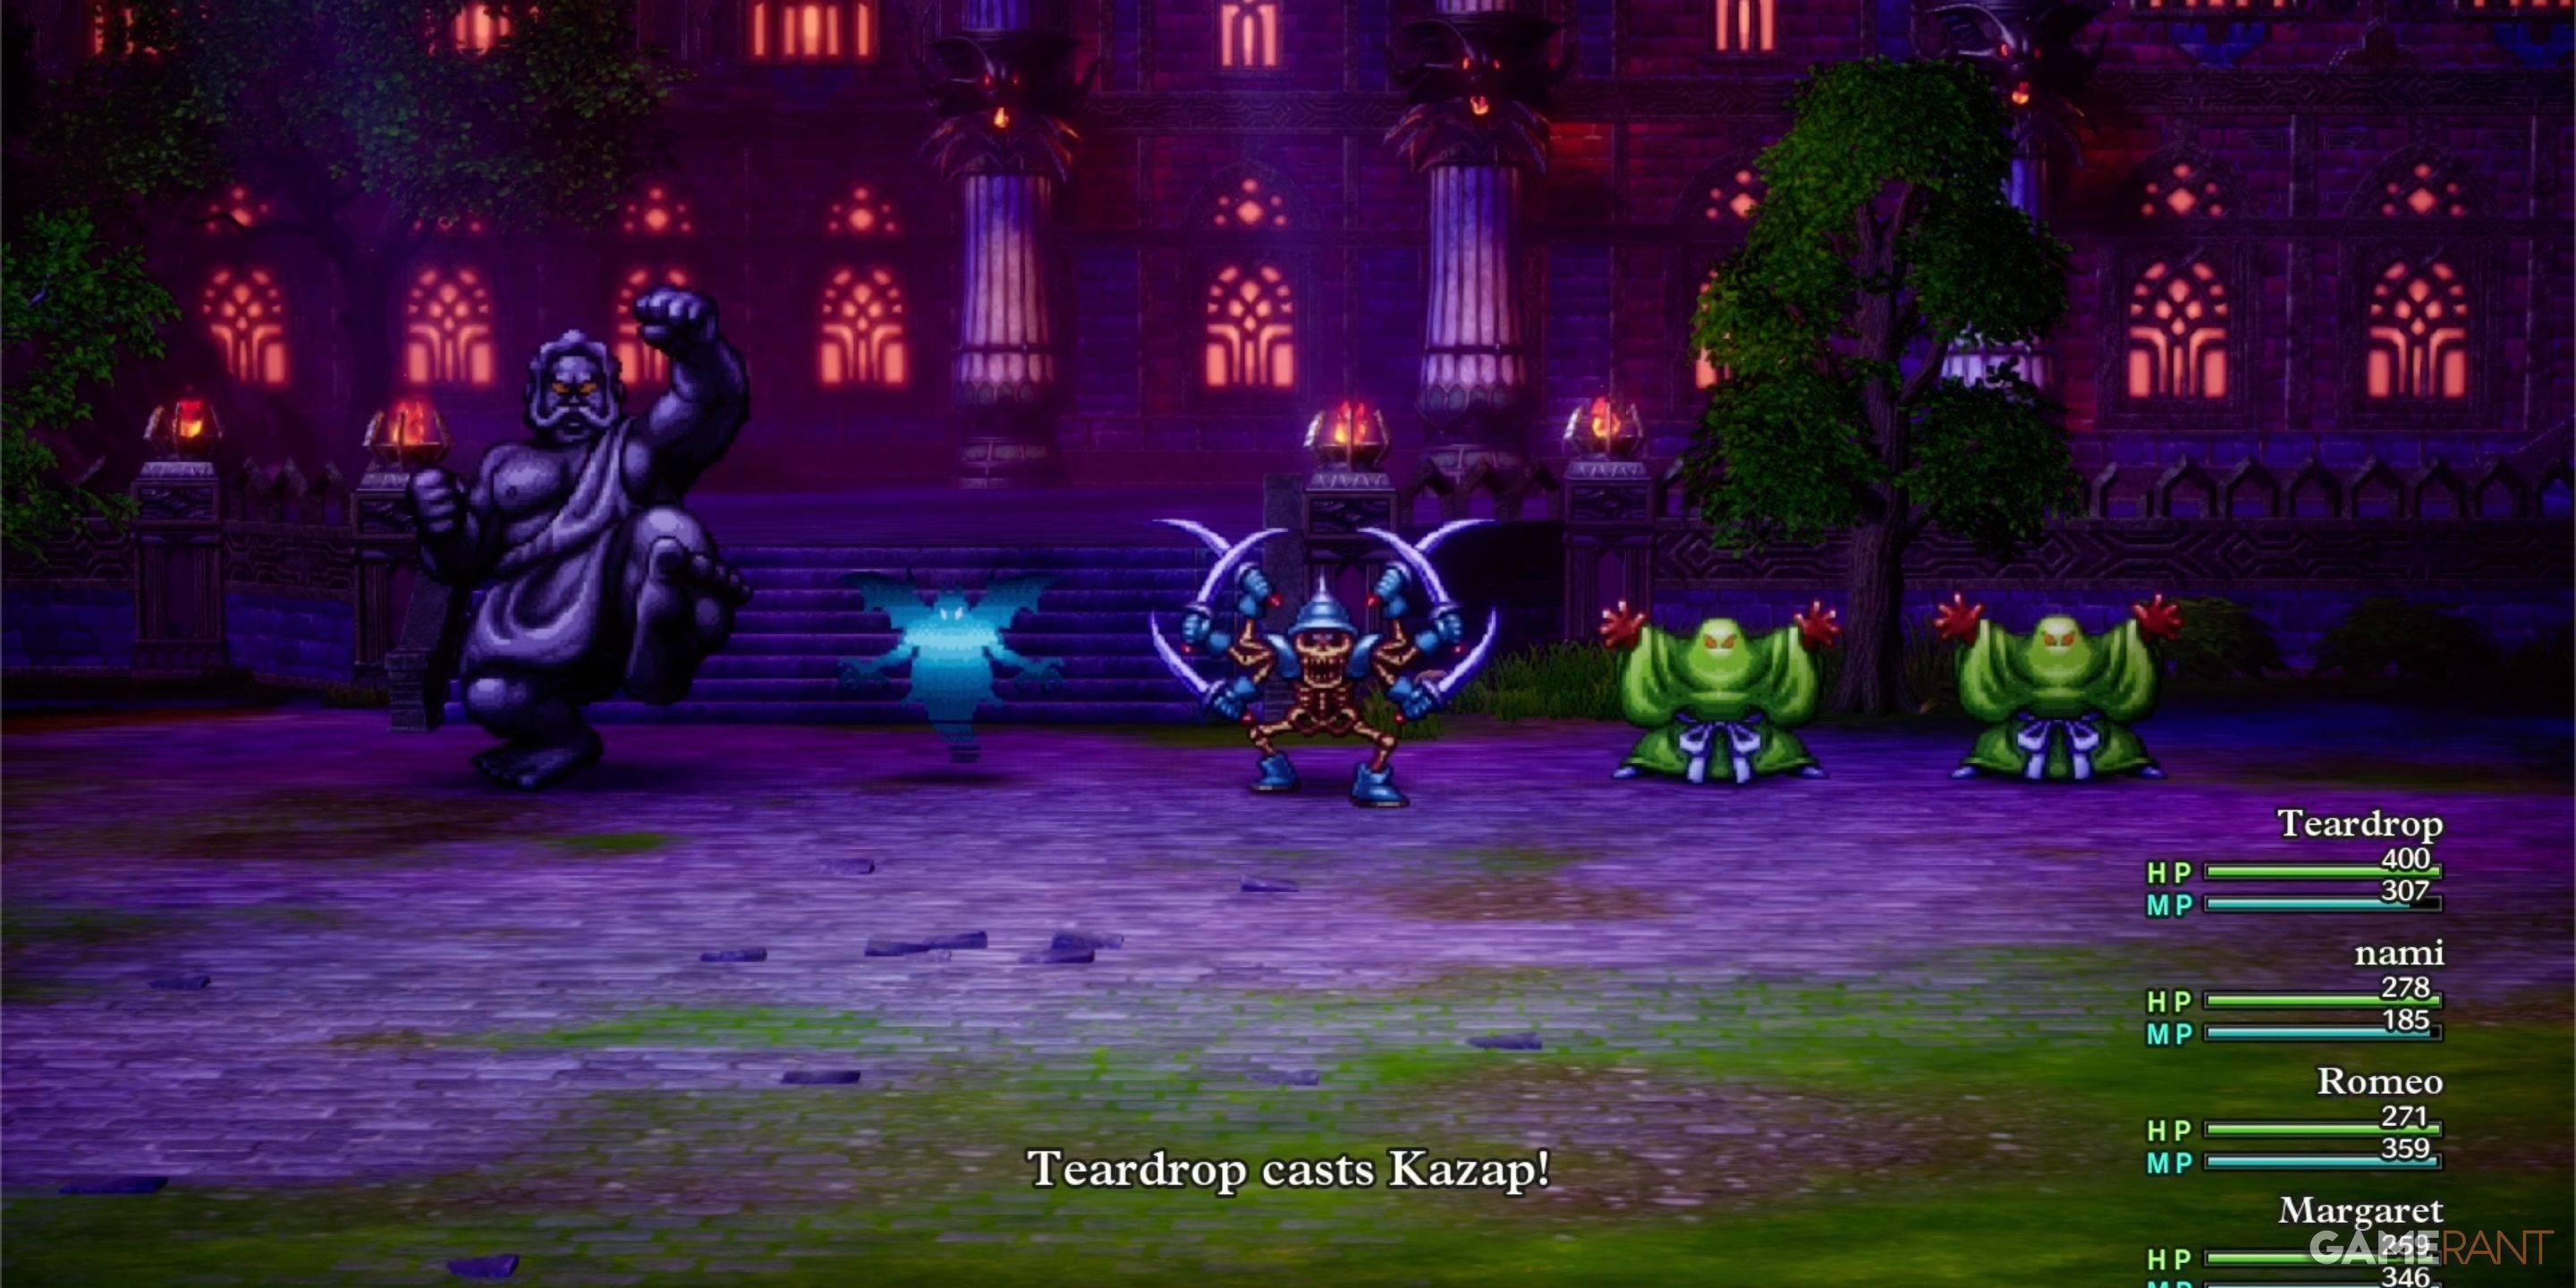
| Имя монстра | Слабость |
|---|---|
| Вооружен | Zap |
| Бореал змей | TBD |
| Детофанк | TBD |
| Leger-De-Man | TBD |
| Живая статуя | Никто |
| Жидкая металлическая слизь | Никто |
| Силуэт | Варьируется (каждый отличается) |
Последние статьи
Трендовые игры


Главные новости

](https://images.dyk8.com/uploads/18/17380116246797f3e8a8a39.jpg)


Последние игры