Mastering Sword and Shield in Monster Hunter Wilds: Moves and Combos Guide
Finding the perfect balance in *Monster Hunter Wilds* can be challenging, as every piece of gear, from armor to Talismans, comes with its tradeoffs. However, when it comes to combat versatility, the Sword and Shield stands out as a reliable choice. Offering both offensive and defensive capabilities, this weapon is ideal for both newcomers and seasoned hunters alike. Here’s how to maximize the potential of your Sword and Shield in *Monster Hunter Wilds*.
Recommended Videos
Sword and Shield in Monster Hunter Wilds
The Sword and Shield is a versatile weapon that can swiftly get you out of tight spots and back into the fray. Its excellent mobility, combined with its damage output and the ability to guard, makes it a solid choice for any situation.
All Moves
| Command | Move | Description |
|---|---|---|
| Triangle/Y | Standard Attack | A basic sword attack that can be chained into a 4-hit combo. Use the analog stick mid-combo to adjust your positioning. |
| Circle/B | Special Attack | Use the analog stick with Circle/B to perform a Shield Attack that deals stun damage. Press Circle/B for a powerful Lateral Slash. |
| Triangle/Y + Circle/B | Advancing Slash | An upward slash performed while advancing forward. Using Advancing Slash while sliding downhill or towards a ledge will allow a terrain-specific attack. |
| Triangle/Y + Circle/B (During Combo) | Roundslash | An attack that slashes a wide area, during which you can quickly change your direction. Chaining it from certain attacks will result in the powerful Spinning Reaper. |
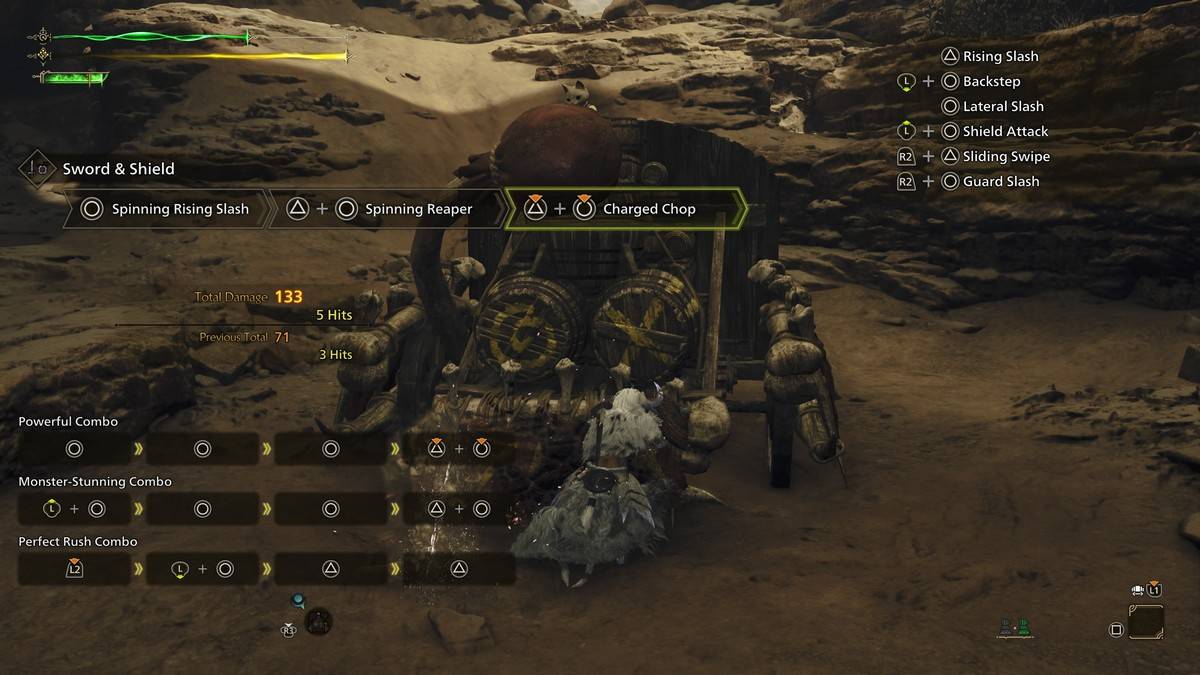
| Holding down Triangle/Y + Circle/B (During Combo) | Charged Chop | A powerful leaping attack. Hitting the soft spot in a monster’s hide will allow you to deal multiple instances of damage. The power of the attack increases if used after certain attacks. |
| Forward on analog stick + Circle/B | Shield Attack | Use the shield to bash into enemies and deal stun damage when targeting the enemy’s head. |
| Push back analog stick + Circle/B (During Combo) | Backstep | Backstep can be used during combos to avoid monster attacks. Press Triangle/Y during a Backstep to perform Perfect Rush, a multi-hit attack that can easily afflict elemental damage and ailments. Press Triangle/Y when the sword flashes to increase damage. |
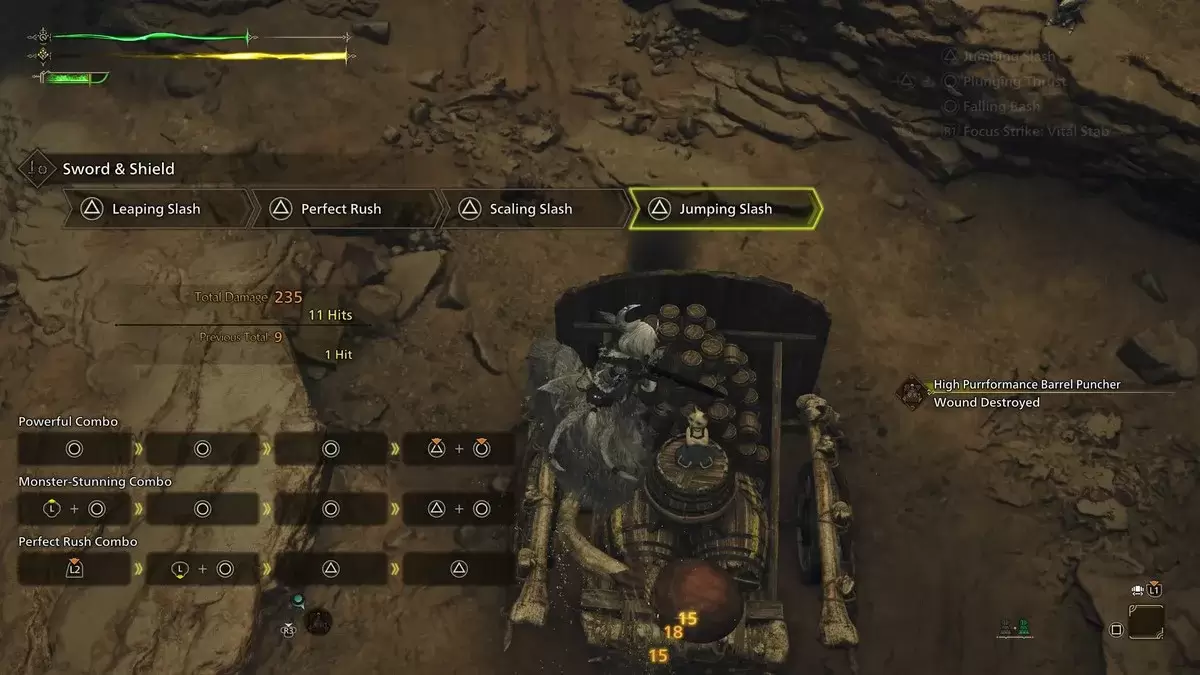
| Circle/B During Backstep | Charged Slash | Landing a Charged Slash after a Backstep allows players to jump high in the air. While airborne, you can follow up with different aerial attacks such as Jumping Slash (Triangle/Y) or a Falling Bash (Circle/B). |
| Hold down R2/RT | Guard | Guard against attacks using your shield. Guarding at the right time will result in a Perfect Guard. Press Triangle/Y after a Perfect Guard to perform a quick and powerful Counter Slash. |
| R2/RT + Triangle/Y | Sliding Swipe | An attack that can be performed easily, allowing you to quickly close the distance between you and the target. |
| R2/RT + Square/X | Use Item | You can use certain items while your weapon is unsheathed. |
| L2/LT + R1/RB | Focus Strike: Vital Stab | A stabbing attack effective against wounds. After hitting the wounds or a weak point, press Triangle/Y to follow up with a Falling Slash, or Circle/B for an Upswing Bash. |
Combos
Lateral Slash Combo
Begin with the Lateral Slash (Circle/B), follow with Return Stroke (Circle/B), then Spinning Rising Slash (Circle/B). Transition into Spinning Reaper (Triangle/Y + Circle/B) and finish with Charged Chop (Hold Triangle/Y + Circle/B). This combo delivers high damage quickly and keeps you mobile.
Shield Bash Combo
To knock down your target, initiate the Shield Attack combo by pointing the analog stick forward and pressing Circle/B, followed by two more Circle/B inputs, and conclude with a Guard Slash (R2/RT + Circle/B). This is most effective when targeting a monster's head, capable of knocking down most monsters after a few repetitions.
Perfect Rush Combo
The Perfect Rush combo is the most potent for the Sword and Shield. Start with any attack, then Backstep (Push back analog stick + Circle/B), Leaping Slash (Triangle/Y), into Perfect Rush (Triangle/Y), followed by Scaling Slash (Triangle/Y), and finish with Falling Bash (Circle/B). Timing is crucial; aim to press buttons when the hunter flashes red for maximum damage.
Related: How to Capture Monsters in Monster Hunter Wild
Sword and Shield Tips
Vary Your Attacks
To expedite the defeat of your target, alternate between fast sword attacks to build elemental damage and shield attacks to inflict stun damage. This combination can quickly topple even the toughest foes.
Dodging and Guarding
When defense is paramount, utilize Guarding and Backstep. Mastering Perfect Guards with precise timing can negate incoming damage, and Power Clashes can push back monsters. Backstep not only evades attacks but also sets up a counterattack. Practice spacing and timing to dominate your encounters.
Focus Strikes
As you inflict more wounds on monsters, employ Focus Strikes to maximize your advantage. The Sword and Shield allows for two follow-up attacks: Falling Slash for multiple hits or Upswing Bash, which can be chained into Falling Bash to increase stun damage.
Item Usage
A unique advantage for Sword and Shield users in Monster Hunter Wilds is the ability to use items with the weapon drawn. This feature allows for quick healing or support, maintaining continuous pressure on your adversaries.
For more in-depth guides and tips on Monster Hunter Wilds, be sure to check out The Escapist.
Monster Hunter Wilds is available now on PlayStation, Xbox, and PC.
Latest Articles
Trending Games


Top News

![Roblox Forsaken Characters Tier List [UPDATED] (2025)](https://images.dyk8.com/uploads/18/17380116246797f3e8a8a39.jpg)


Latest Games